hmm - so my transparency in front of the plexiglass with black and creme lettering - you're saying the black won't block the light from comming through - what if it was 2 transparencies thick - or is plastic the only way to go
would it matter if it was backlit versus lit from the edge
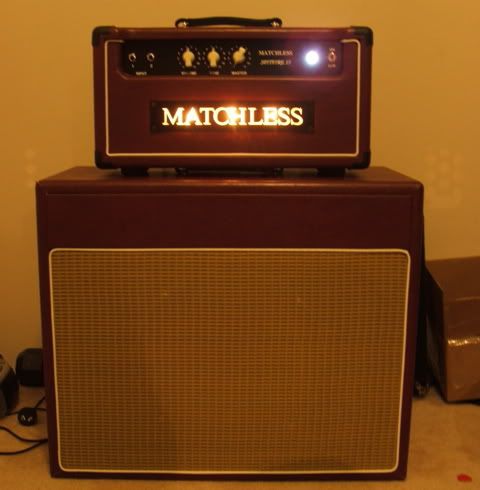
Crazy idea.. how to make a Matchless-style glowing faceplate
Moderators: zaphod_phil, Daviedawg, Graydon, CurtissRobin, colossal
-
Gauge

- Occasional poster

- Posts: 259
- Joined: Wed 07/20/05 2:00 am
- Location: Unknown
- Contact:
-
JoeV
- Occasional poster
- Posts: 195
- Joined: Tue 08/16/05 2:00 am
- Location: MD - USA
- Contact:
If you're doing a backlit plate, you should do a reverse engraved plastic plate without the text backfill (leave the lettering clear). It would look killer.
I can do this for you. Go to my site (www.amplates.com) for more info.
Thanks!
I can do this for you. Go to my site (www.amplates.com) for more info.
Thanks!
0 x
-
Dynaflow_Donnie

- Frequent poster

- Posts: 986
- Joined: Sat 12/31/05 2:00 am
- Location: Phoenix, AZ.
- Contact:
-
LeeMo
- Frequent poster
- Posts: 929
- Joined: Mon 02/16/04 2:00 am
- Location: Mississippi Delta
http://www.beingseen.com/ http://www.amazon.com/gp/product/B0007L ... n=15684181
http://www.amazon.com/gp/product/B000AU ... n=15684181
It's amazing what Google will turn up.
I have some blue plazma glow that I used in one of my son's show cars. I made a Mitsubishi triple diamond with it wired to the trunk lid light. It does use a 12 volt transformer but I'm pretty sure that it's all D.C. so the noise shouldn't be a problem. You could wrap it around the faceplate at the edge. You can trim it to length. You can't, however, make sharp turns with it. To make the diamond , I put holes at the points and looped the wire out and back thru to avoid kinking.
LeeMo
0 x
-
okstrat
- Newbie

- Posts: 98
- Joined: Sun 07/17/05 2:00 am
- Location: Unknown
What about using clear plexi, and go to a sign shop and have your 'block' made in thick white sign vinyl with a black vinyl cover over that?lagerdog wrote:You'll never get there that way... you can't block enough light with the ink... Worked for years in the control panel lighting industry, and the only way for appliques or rubber is to have a barrier coat of white down under the black or whatever color you are trying to use. And it should be thick and opaque... A laser printer won't do it...just putting this out there, but instead of a plastic faceplate in black and engraved from the rear in creme or some other semi-transparent color, why couldn;'t i print out a transparency and mount it to a piece of clear plexi glass (printing in black with the letters in creme or white or whatever
Pete
0 x
-
dubs
- Newbie
- Posts: 70
- Joined: Wed 10/27/04 2:00 am
- Location: down under
Yeah I've done it with my spitfire clone using rear etched plexi plates that were made (I've got some spare if anyone's interested):
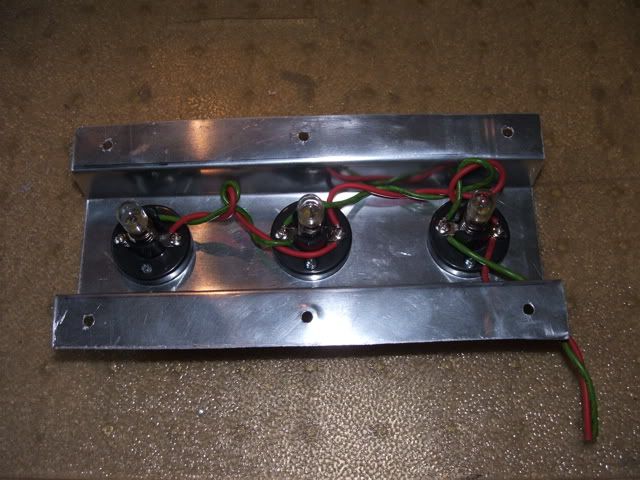
made a light box using sheet aluminium, routed a hole in the front panel, attached some 6.3v bulbs which is wired the 6.3v heater wiring:
My only comment is that the plexi will flex alittle from the heat from the bulbs so you should glue the plate on as well as screw it to the front panel and it will be o.k. Otherwise you could use coloured leds with current limiting resistors to the 6.3v heater and that will give off less heat..
0 x
-
cbryant
- Newbie
- Posts: 42
- Joined: Wed 12/21/05 2:00 am
- Location: Unknown
-
lagerdog

- Occasional poster
- Posts: 233
- Joined: Thu 01/27/05 2:00 am
- Location: Idaho, USA
Probably should work...What about using clear plexi, and go to a sign shop and have your 'block' made in thick white sign vinyl with a black vinyl cover over that?
Pete
OK, here's the scoop... the white is usually fairly opaque, and reflects alot of interior light around... The black (or whatever color you want) is put over it as your external finish look. Remember, what you want it to block the light...The only problem with using tranparencies is that the ink is WAY too thin and will look gray, or really be hotspotty and show where the light is. What you want is to spread the light out equally to illuminate things. That is why, with a lightpipe system, that you can etch into a piece of acrylic or PC, and light the side of the piece with a few LEDs or lamps, and the light that hits the engraving reflects the light allowing it to seem to glow. It is always hard to light the back of something and not have distinct light areas, like in the picture above. If you were trying to glow the text evenly, there are better ways of doing it. Maybe a piece of acrylic that has been sanded/blasted before the text to act as a diffuser... It can get pretty elaborate... At least LEDs don't have the heat of an incandescent bulb!!!
0 x
-
curtg
- Unrated
- Posts: 8
- Joined: Thu 10/25/07 2:00 am
- Location: Birmingham AL
Hey, I know this is a bit late, but I did this on a custom 18 watt build. It might spur some ideas.
Paul Ruby was a big help getting me started. I designed my faceplate in Corel Draw, and sent to Jeannie at BNP Lasers. Rear etched panel with the Dragonfly logo transparent. I did the chassis cutout with a drill and a Dremel (the hardest part), and back lit it with 2 LEDs, a 2mm red one, and a 3mm blue one, both fed through current-limiting resistors tied to EL84 cathode.
Here's a photo.
0 x
-
morcey2
- Frequent poster
- Posts: 705
- Joined: Tue 06/06/06 2:00 am
- Location: Utah
That is one of the coolest things I think I've ever seen! That's awesome.curtg wrote:Hey, I know this is a bit late, but I did this on a custom 18 watt build. It might spur some ideas.
Paul Ruby was a big help getting me started. I designed my faceplate in Corel Draw, and sent to Jeannie at BNP Lasers. Rear etched panel with the Dragonfly logo transparent. I did the chassis cutout with a drill and a Dremel (the hardest part), and back lit it with 2 LEDs, a 2mm red one, and a 3mm blue one, both fed through current-limiting resistors tied to EL84 cathode.
Here's a photo.
Matt
0 x
-
rjgtr
- Builder, Admin

- Posts: 6668
- Joined: Wed 11/24/04 2:00 am
- Location: Jax, FL
- Contact:
-
Chubsman

- Frequent poster
- Posts: 974
- Joined: Fri 11/25/05 2:00 am
- Location: Ottawa, ON - Canada
BTW... how Matchless themselves make the faceplates.
http://matchlessamplifiers.com/tour.php ... ur&numbr=6
http://matchlessamplifiers.com/tour.php ... ur&numbr=6
0 x
-
curtg
- Unrated
- Posts: 8
- Joined: Thu 10/25/07 2:00 am
- Location: Birmingham AL
Thanks, very much appreciated! Sorry for the delay in getting back to this post.
The resistor for the blue LED is 1.5k and I can't recall the value for the red one. It's on my schematic at home. Probably somewhere between 1-2k
Here's a photo of the faceplate on the original amp. I've since changed the trim on the metal grill to flat, 2.5 mm aluminum strips to better match, and changed the screws to what I call "gun metal finish" which is actually called "antique brass."

BTW, thanks for posting the link to the Matchless tour. That's inspiring!
The resistor for the blue LED is 1.5k and I can't recall the value for the red one. It's on my schematic at home. Probably somewhere between 1-2k
Here's a photo of the faceplate on the original amp. I've since changed the trim on the metal grill to flat, 2.5 mm aluminum strips to better match, and changed the screws to what I call "gun metal finish" which is actually called "antique brass."
BTW, thanks for posting the link to the Matchless tour. That's inspiring!
0 x
-
ricardorx
- Unrated
- Posts: 4
- Joined: Fri 11/17/06 2:00 am
- Location: Unknown
Re: Crazy idea.. how to make a Matchless-style glowing facep
alguem chegou a executar o painel luminoso para o marshall?
0 x
-
zaphod_phil
- Builder, Admin
- Posts: 15208
- Joined: Wed 03/19/03 2:00 am
- Location: YYZ
Re: Crazy idea.. how to make a Matchless-style glowing facep
Using Google Translate I worked out that the question was in Portugese, and says something along the lines of, "anybody done a light panel for marshall?"
Anyone want to comment?
Anyone want to comment?
0 x
Nature abhors a clean tube amp
-
KenMoon
- Newbie
- Posts: 87
- Joined: Fri 10/07/05 2:00 am
- Location: Jax, Florida
Re: Crazy idea.. how to make a Matchless-style glowing facep
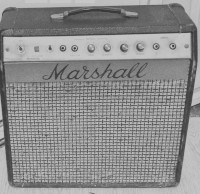
Here's how Paul Ruby did it on his Miriam amp:
You do not have the required permissions to view the files attached to this post.
0 x